How to Secure Kubernetes Clusters with CIS Benchmarks
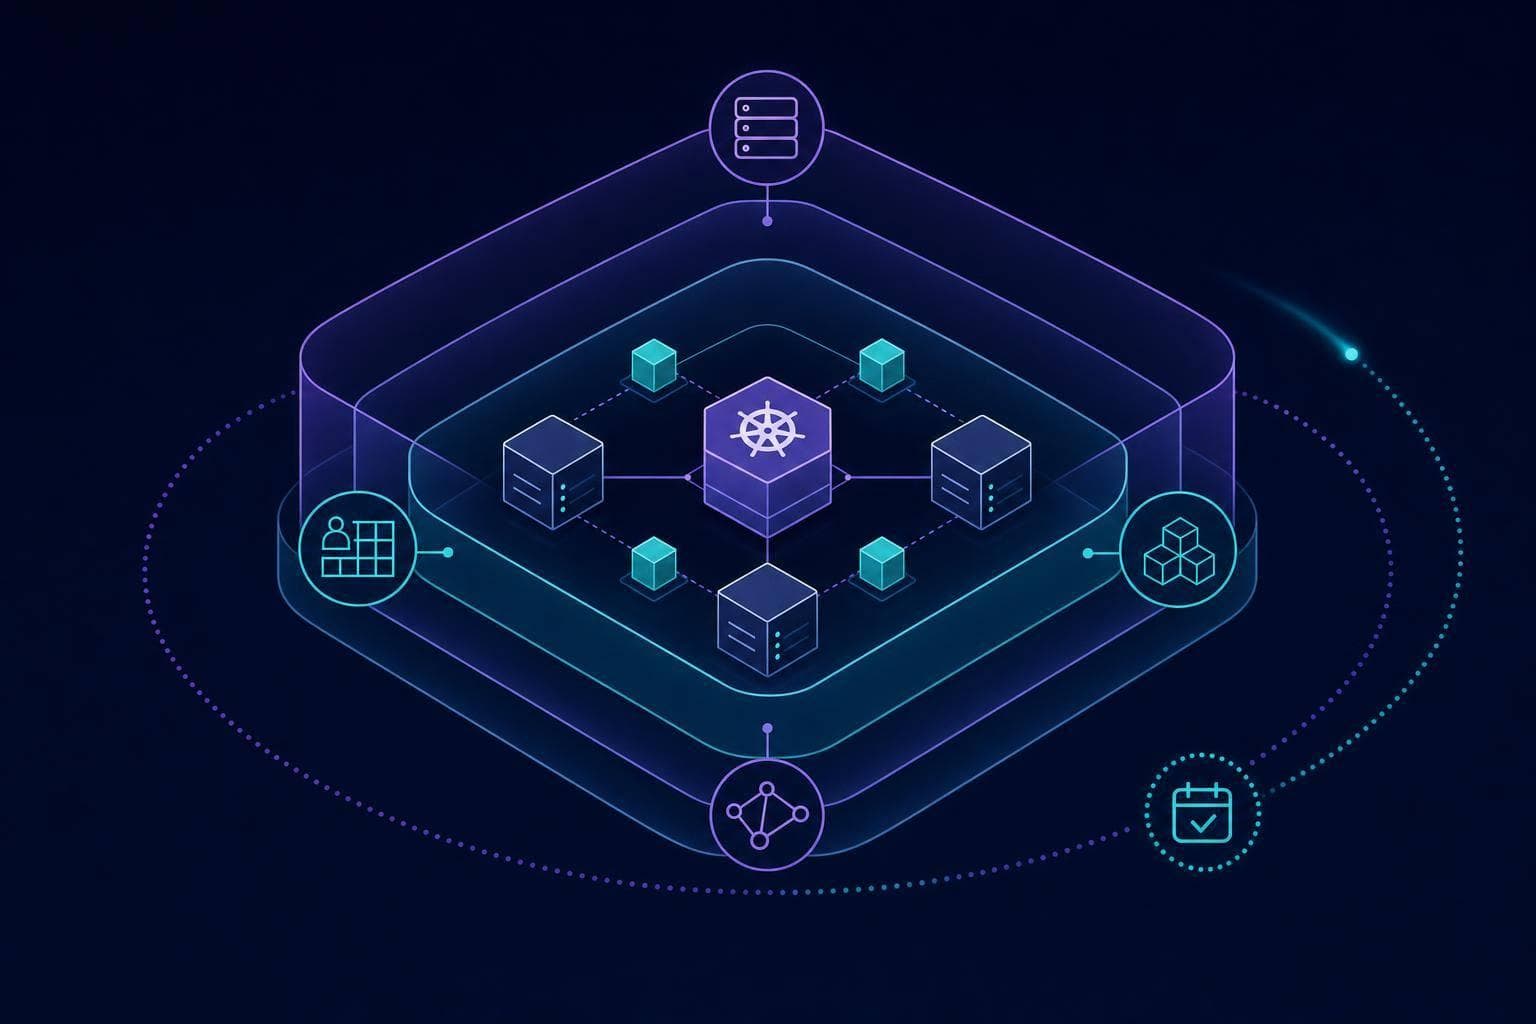
How to Secure Kubernetes Clusters with CIS Benchmarks
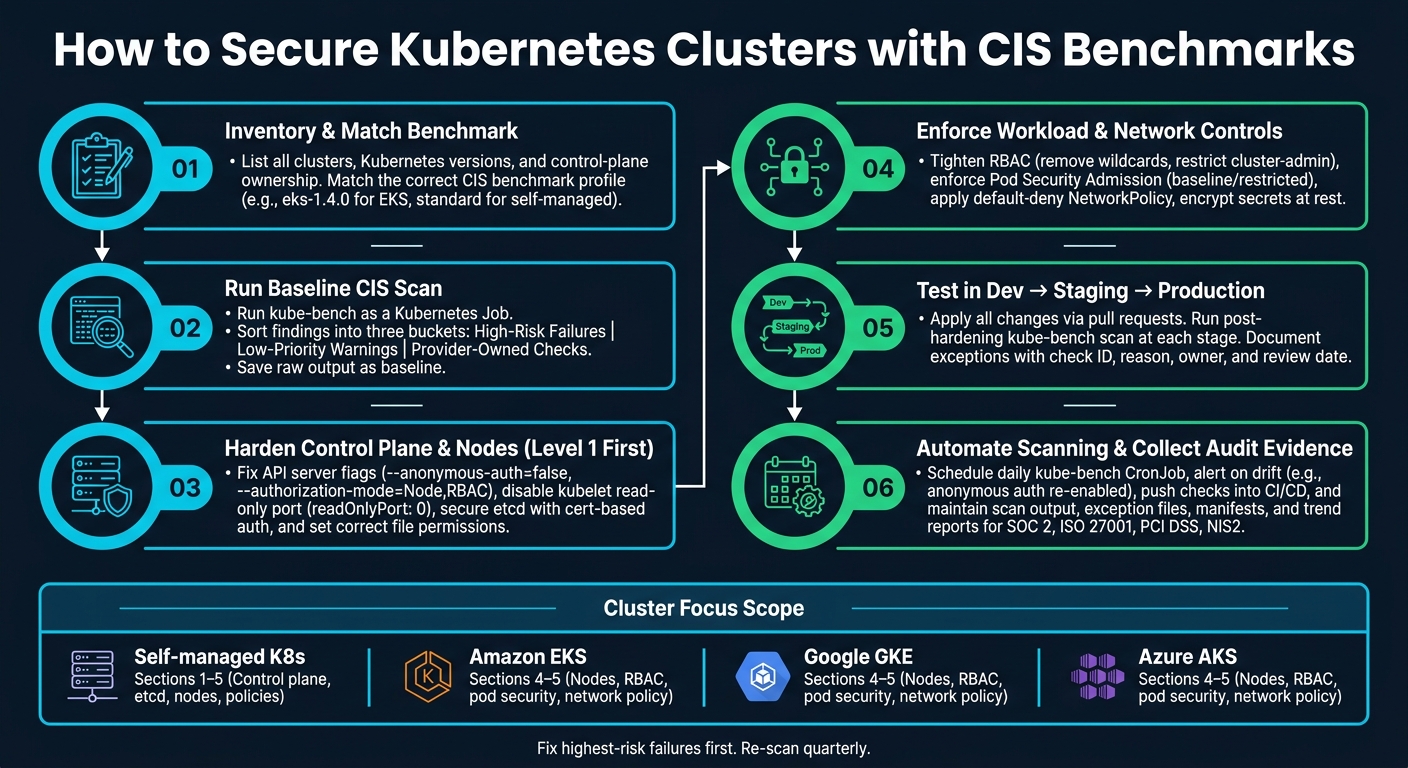
If I want a safer Kubernetes cluster without breaking production, I start with the right CIS benchmark, fix Level 1 issues first, and scan for drift every day.
In plain terms, this article shows how I would secure self-managed Kubernetes and managed clusters like EKS, GKE, and AKS with CIS checks that map to what I can actually change. It focuses on the controls that cut risk fastest: API server access, kubelet settings, etcd protection, RBAC, pod security, network policy, and secrets encryption.
Here’s the short version:
- I match the benchmark to the cluster type and Kubernetes version
- I split findings into high risk, low priority, and provider-owned
- I start with Level 1 checks before moving to Level 2
- On managed clusters, I focus mostly on worker nodes and policy controls
- On self-managed clusters, I also harden the control plane and etcd
- I keep scan output, exceptions, manifests, and trend data for audits such as SOC 2, ISO 27001, PCI DSS, and NIS2
A few checks matter more than most because they can expose data fast. For example, anonymous API access, an open kubelet read-only port, or weak etcd settings can leave cluster data and secrets open. That’s why I would fix those first, then move to workload and network controls.
Quick comparison:
| Cluster type | Main CIS focus | What I usually own |
|---|---|---|
| Self-managed Kubernetes | Control plane, etcd, nodes, policies | Most settings across Sections 1 to 5 |
| Amazon EKS | Nodes, RBAC, pod security, network policy | Mostly Sections 4 and 5 |
| Google GKE | Nodes, RBAC, pod security, network policy | Mostly Sections 4 and 5 |
| Azure AKS | Nodes, RBAC, pod security, network policy | Mostly Sections 4 and 5 |
The key point: I would not chase every FAIL result. In managed Kubernetes, some failed checks point to cloud-provider controls rather than gaps I need to fix myself.
So if I wanted a simple path, it would be this: scan first, fix the highest-risk settings, test in dev and staging, then automate checks so drift does not creep back in.
Kubernetes CIS Benchmark Hardening: Step-by-Step Security Workflow
Kubernetes Security Made Easy: Complete CIS Benchmark Tutorial
sbb-itb-5d9b290
Prepare your cluster, tools and rollout plan
Before you change a single setting, get a clear view of the estate in front of you. If you rush into hardening, you can knock over production workloads or spend hours fixing the wrong issue first.
Inventory clusters, versions and control-plane ownership
List each cluster, its environment, Kubernetes version, and benchmark profile. Note whether the control plane is provider-managed or self-managed, because that decides which CIS controls you can change. Also record the config source of truth, so every hardening change lands in version-controlled files.
It also helps to check who currently holds cluster-admin access before you begin. The command kubectl get clusterrolebindings -o json | jq '.items[] | select(.roleRef.name=="cluster-admin") | .subjects' gives you a clear list of every entity with break-glass privileges.
Once you’ve mapped ownership and versions, run a baseline scan before changing anything.
Run a baseline CIS scan and group findings by risk
Run kube-bench as a Kubernetes Job with the right benchmark profile:
kubectl apply -f https://raw.githubusercontent.com/aquasecurity/kube-bench/main/job.yaml
kubectl logs <job-pod-name>
Then sort the findings into a few simple buckets:
- high-risk failures
- low-priority warnings
- provider-owned checks
Save the raw output in your repository as a baseline file so you can spot drift later.
Pair kube-bench with Trivy for images and Checkov for IaC.
Those results will show you what to test in dev first.
Test changes safely before touching production
Apply all hardening changes through pull requests, not straight onto live clusters. Any change to an API server flag, kubelet config, or RBAC rule should be reviewed before it gets anywhere near production.
Promote changes from dev to staging to production. Run a post-hardening kube-bench scan at each stage. If a control breaks a workload, record the check ID, reason, owner, and review date in an exceptions file.
Once the rollout path is clear, harden the control plane and nodes.
Apply CIS hardening to the control plane and nodes
With your baseline scan done, start with Level 1 controls first. They tend to give you a lot of security value without a lot of pain, and they usually carry less risk.
Lock down the API server, scheduler and controller manager
Begin with the API server. Set --anonymous-auth=false to block unauthenticated requests, and set --authorization-mode=Node,RBAC so each request is authorised. If your manifest includes a --token-auth-file flag, remove it.
Audit logging should be near the top of your list. If it's off, you lose a key record of what happened during an incident, which makes investigation much harder. On self-managed clusters, add --audit-policy-file and --audit-log-path to the API server manifest at /etc/kubernetes/manifests/kube-apiserver.yaml. Once you save the manifest, the API server restarts and loads the new settings.
For the scheduler and controller manager, turn off profiling with --profiling=false and bind both services to localhost with --bind-address=127.0.0.1. That stops them being exposed outside the node.
If you're on a managed cluster, use the provider CIS profile instead. For example, run kube-bench run --benchmark eks-1.4.0 so the scan reports only the controls you manage.
After that, move to etcd and kubelet settings on self-managed clusters.
Protect etcd and node services
etcd holds cluster state, including secrets, so it deserves attention early. Require certificate-based authentication for both clients and peers by setting --client-cert-auth=true and --peer-client-cert-auth=true. Also set --peer-auto-tls=false to stop peer auto-TLS, which helps cut the risk of unauthorised nodes joining.
On worker nodes, disable the kubelet read-only port by setting readOnlyPort: 0. Also set authentication: anonymous: enabled: false and use Webhook authorisation instead of AlwaysAllow. The read-only port shows up again and again in misconfigurations, and when it's left open, it can expose pod and node metrics with no authentication at all.
File permissions also trigger a lot of CIS findings. Sensitive manifests and config files should be owned by root:root. CIS expects 644 on manifest files and 600 on admin.conf:
| File path | Permissions | Ownership |
|---|---|---|
/etc/kubernetes/manifests/kube-apiserver.yaml |
644 |
root:root |
/etc/kubernetes/manifests/kube-controller-manager.yaml |
644 |
root:root |
/etc/kubernetes/manifests/kube-scheduler.yaml |
644 |
root:root |
/etc/kubernetes/manifests/etcd.yaml |
644 |
root:root |
/etc/kubernetes/admin.conf |
600 |
root:root |
/var/lib/kubelet/config.yaml |
644 |
root:root |
Set the ownership and permissions listed above, then run kube-bench again to check that the findings are gone.
Once those host files are sorted, move on to RBAC, pod security and network policy.
Use provider or distribution CIS profiles where available
Provider-specific benchmarks leave out controls handled by the cloud provider, so the scan focuses on what you can act on. As AWS notes in its documentation:
"As Amazon EKS provides a fully managed control plane, not all of the recommendations from the CIS Kubernetes Benchmark are applicable as you are not responsible for configuring or managing the control plane." - AWS Blog
Some Kubernetes distributions take this even further. Talos Linux, for example, passes many host-level CIS checks by default because it is immutable and has no SSH access by design. If your distribution includes a pre-hardened profile, start there instead of setting every flag by hand.
Re-run kube-bench after each change and track exceptions.
Harden workloads, access and network policies
Next, lock down the policy layer that decides what workloads can do and where they can connect. In managed Kubernetes, this is where many of the CIS checks you can act on tend to live. How Nuvm compares to DIY tools can help you decide on the right automation strategy. Sections 4 and 5 cover RBAC, pod security, network policies, and secrets.
Tighten RBAC and service account tokens
Start by checking cluster-admin bindings again, then strip out wildcard permissions and narrow secret access as much as you can. Most workloads do not need cluster-wide rights. If you spot wildcard permissions (*) on verbs or resources, swap them for the exact actions the workload needs. It’s also worth looking closely at who can get or list secrets. That access should stay tightly limited.
For service accounts, set automountServiceAccountToken: false on the default service account in each namespace, and on any pod that doesn’t need to talk to the API server. If a workload does need API access, log that as an exception and track it, instead of leaving broad token exposure in place.
Enforce pod security controls
Use Pod Security Admission to label namespaces based on the type of workload they run: baseline for general workloads, restricted for sensitive apps, and privileged only for system components.
Before you move a namespace to enforce mode, use warn or audit first so you can spot workloads that would fail:
kubectl label --overwrite namespace <namespace-name> \
  pod-security.kubernetes.io/warn=baseline \
  pod-security.kubernetes.io/audit=baseline
When you’ve checked that nothing will fall over, switch to enforce=baseline for general workloads and enforce=restricted for sensitive or regulated apps. You can also apply the same checks at admission with Kyverno or OPA Gatekeeper.
Inside the pod securityContext, a few settings matter most:
allowPrivilegeEscalation: false- Drop Linux capabilities the workload doesn’t need
- Set
seccompto at leastRuntimeDefault
Restrict network traffic and protect secrets
Once access control and admission policy are in place, cut down pod-to-pod traffic. Apply a default-deny NetworkPolicy in every namespace, then allow only the ingress and egress the workload needs. If one pod gets hit, that helps keep the damage from spreading.
Then tighten up how secrets are stored and exposed. Kubernetes does not encrypt secrets in etcd by default. On self-managed clusters, enable etcd encryption with --encryption-provider-config; mount secrets as files rather than environment variables; and never put secrets in a ConfigMap.
| CIS Section | Focus Area | Key Action |
|---|---|---|
| 4.x | RBAC & Service Accounts | Remove wildcards, restrict cluster-admin, disable token automount |
| 5.2 | Pod Security | Enforce Baseline or Restricted PSS via namespace labels |
| 5.3 | Network Policies | Default-deny ingress and egress in every namespace |
| 5.4 | Secrets Management | Encrypt at rest, mount as files, avoid ConfigMaps |
Automate CIS compliance and keep evidence ready
Schedule recurring scans and track drift
Once hardening is in place, the next job is simple: keep checking for drift.
A one-off hardening pass can make things look fine for a moment. But that confidence fades fast. Drift brings risk back. A cloud provider update that resets kubelet flags, or a change slipped in between audits, can undo earlier hardening without much noise.
Run kube-bench every day in a CronJob and export the JSON output to central storage. Then compare each run against a known baseline. If failures go up, or a new critical check starts failing, alert on it straight away. One example is anonymous authentication being turned back on (1.2.1).
It also helps to push the same checks into CI/CD. That way, drift gets stopped before merge instead of being found later in production. Use the right managed-service profile so checks owned by the provider do not fail the gate.
For audit evidence, keep:
- scan output
- an exception file
- the relevant manifests
- a trend report
The aim is continuous proof of control, not a one-off screenshot. Auditors for SOC 2 or ISO 27001 usually want to see monitoring over time, not just a single point-in-time result.
Manual hardening versus automated platforms: a comparison
If manual checks are already eating up too much time, it helps to compare the main ways teams handle this work:
| Approach | Effort | Coverage | Audit Readiness | Best For |
|---|---|---|---|---|
| Manual hardening | High: SSH checks and manual review | Often partial; node checks are frequently missed | Point-in-time reports only | Single cluster, learning the benchmark |
| Open-source (kube-bench + GitOps) | Medium - setup and ongoing maintenance required | High when configured correctly | Raw JSON/JUnit output, but evidence still needs manual collation | Small teams comfortable with DevOps tooling |
| Automated platforms (e.g., Nuvm Cloud) | Low - automated discovery | Unified across nine integrated scanners | Automated evidence mapping for SOC 2, PCI DSS, ISO 27001 and NIS2 | Small and mid-sized SaaS teams without a dedicated security engineer |
As cluster numbers go up, the admin load goes up with them. Managing cron schedules, pulling logs together, chasing remediation owners, and building evidence packs can get heavy fast.
Nuvm Cloud fits small teams that want Kubernetes, image, IaC, secrets, and cloud posture scanning in one place.
Conclusion: start with high-impact controls and review quarterly
Work through the benchmark in order: choose the right profile for your cluster type, run a baseline scan, harden the control plane and nodes, enforce workload and network controls, then automate scanning and evidence collection. You do not need 100% compliance on day one. Start with the highest-risk failures and document any exceptions.
Re-run scans, check if the CIS benchmark has changed, review your exception list, and confirm that your managed-service provider’s responsibility boundaries have not moved. Do that every quarter.
FAQs
Which CIS benchmark should I use for my cluster?
Use the CIS Kubernetes Benchmark version that matches your Kubernetes version, then pick the level that fits your security needs.
Start with Level 1 if you want a strong baseline without much day-to-day friction. Use Level 2 more selectively in higher-security setups, where tighter controls make sense. Tools like kube-bench can help you check compliance.
What should I fix first without risking production?
Start by scanning a non-production cluster with kube-bench to set a baseline. Then tackle Level 1 findings first, because they usually tighten security without adding much operational risk.
Roll out changes bit by bit in a staging environment that closely matches production. Test for issues like RBAC problems or network policy conflicts, and keep watching for drift and compliance.
How do CIS checks differ on EKS, GKE and AKS?
CIS checks work differently on EKS, GKE and AKS.
Why? Because the cloud provider runs the control plane. That means users can't get into, or change, parts like the API server, etcd, controller manager and scheduler.
So the benchmark leaves out those control plane checks and sticks to the parts users can actually manage, such as:
- worker node security
- RBAC
- network policies
- workload configuration
If you use the standard CIS Kubernetes Benchmark on a managed cluster, you can end up with false failures. In plain terms, the tool may flag issues in areas you were never able to control in the first place.