Checklist for Managing Dependency Vulnerabilities

Checklist for Managing Dependency Vulnerabilities
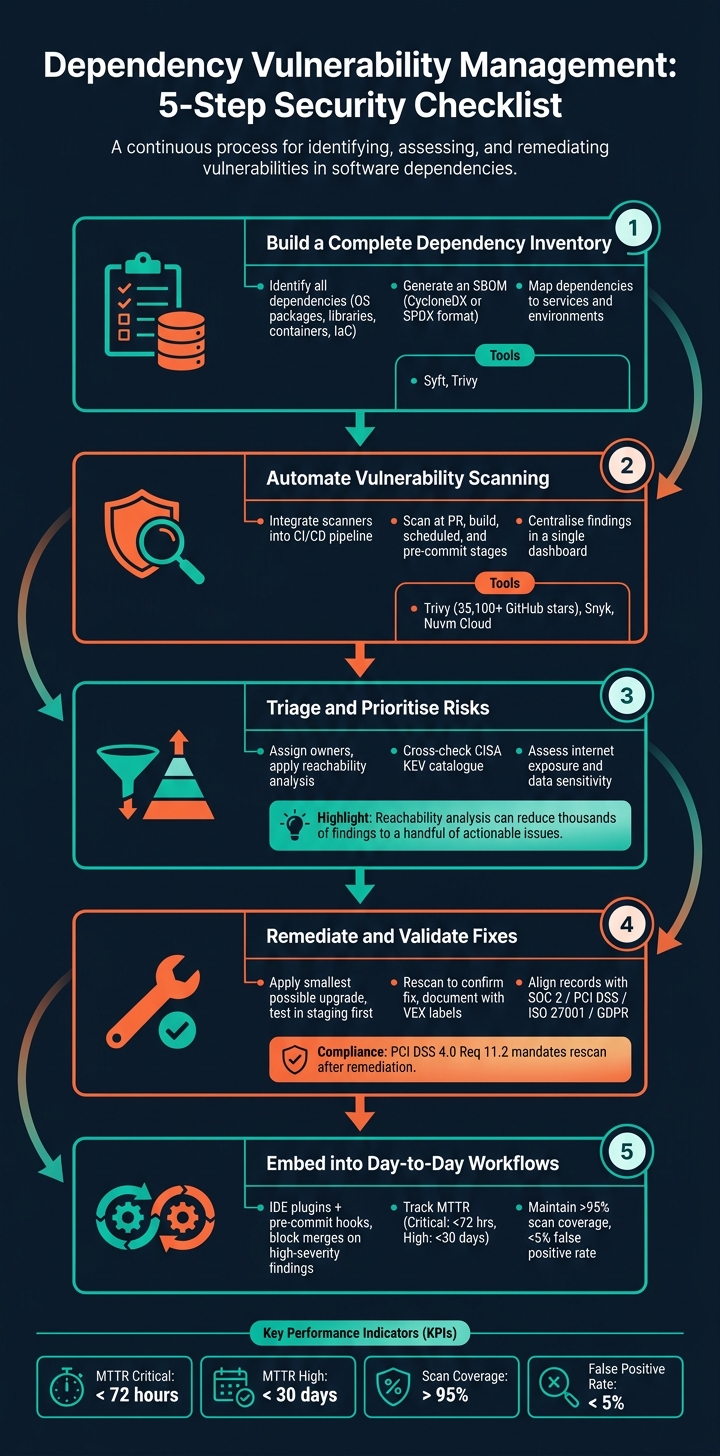
Modern applications rely heavily on third-party dependencies, but these can introduce critical security risks. Managing these vulnerabilities effectively is crucial to protect your software and data. Here's a quick breakdown of how to handle dependency vulnerabilities:
- Create a Dependency Inventory: Maintain a detailed list of all dependencies, including their versions and environments. Use tools like Syft or Trivy to generate a Software Bill of Materials (SBOM).
- Automate Scanning: Integrate tools like Trivy or Snyk into your CI/CD pipeline to continuously scan for vulnerabilities.
- Prioritise Risks: Focus on vulnerabilities that are actively exploited, affect critical services, or handle sensitive data. Use reachability analysis to reduce noise.
- Fix and Validate: Apply targeted updates to resolve vulnerabilities, validate fixes with rescans, and ensure compliance with frameworks like SOC 2 or PCI DSS.
- Embed in Workflows: Add security checks to developer tools, track metrics like MTTR (Mean Time to Remediate), and review tools regularly to avoid blind spots.
Dependency Vulnerability Management: 5-Step Security Checklist
Managing Vulnerabilities in Open-Source Dependencies - Eva Sarafianou, Mattermost

sbb-itb-5d9b290
1. Build a Complete Dependency Inventory
You can only secure what you know exists. Before diving into vulnerability scans or risk assessments, it’s crucial to have a precise and detailed record of every dependency used in your application. As Hive Pro aptly put it:
"If your inventory is stale, your vulnerability data is meaningless."
1.1 Identify All Dependencies and Artefacts
Creating a thorough inventory goes far beyond just your package.json. You’ll need to include everything: operating system packages, language-specific libraries, container images, build tools, and even Infrastructure as Code configurations. Lockfiles like package-lock.json, poetry.lock, and Gemfile.lock are particularly important because they capture the exact versions in use, not just the intended ones.
Don’t forget to scan all potential targets, including container images, filesystems, remote Git repositories, and Kubernetes clusters. Missing any of these layers could leave significant gaps in your inventory, creating blind spots.
Once you’ve gathered all this information, convert it into a Software Bill of Materials (SBOM) to make vulnerability scanning more efficient.
1.2 Generate a Software Bill of Materials (SBOM)
A well-organised inventory serves as the foundation for an SBOM, which is essential for tracking dependency versions during vulnerability checks. An SBOM is essentially a detailed manifest listing all dependencies, their versions, and their source registries. Tools like Syft and Trivy (both free and open-source) can automatically generate SBOMs during the build process. To ensure compatibility with vulnerability scanners and compliance tools, export your SBOM in formats like CycloneDX or SPDX. For instance, Trivy has supported CycloneDX 1.7 since May 2026.
The real power of an SBOM becomes evident during incidents. Take, for example, the Log4Shell vulnerability. With an SBOM, you can quickly identify all services running the affected version, saving you from the chaos of manually combing through repositories under pressure.
1.3 Map Dependencies to Services and Environments
To prioritise risks effectively, it’s essential to link each dependency to the specific microservice and environment it belongs to, whether that’s development, staging, or production.
This approach proved invaluable during the March 2026 Trivy compromise. Teams with clear mapping could quickly identify and address affected pipelines, while those without such mapping faced significant delays.
Additionally, pinning dependencies using cryptographic SHA hashes in your CI/CD pipelines can prevent version tag overrides, adding an extra layer of security.
2. Automate Dependency Vulnerability Scanning
Once you’ve established your dependency inventory, the next step is to ensure vulnerabilities are caught automatically - no manual checks, no delays. Continuous scanning, integrated into your development workflow, is key to staying ahead of potential threats.
2.1 Choose and Configure Scanning Tools
Start by selecting a scanning tool that suits your needs. Trivy, for instance, is a free, open-source option with over 35,100 GitHub stars as of May 2026. It’s a lightweight, CLI-first tool ideal for scanning container images, filesystems, and Git repositories quickly. For teams seeking deeper integration into developer workflows, Snyk offers features like IDE plugins, pull request checks, and automated fix suggestions. However, it can become costly as your team scales. Alternatively, platforms like Nuvm Cloud offer an all-in-one solution, combining dependency, container, IaC, secrets, and code scanning into a single dashboard, which can save smaller SaaS teams from juggling multiple tools.
Consistency is critical. Standardise scanner settings across all repositories to avoid blind spots. For example, if one repository scans at a "High" severity threshold and another at "Critical", medium-severity vulnerabilities might go unnoticed.
"CI/CD pipelines have become the 'new perimeter' of security." - Kaspersky
2.2 Integrate Scanners into CI/CD Pipelines
To maximise the value of your scanners, they need to run automatically and consistently at key stages in your CI/CD pipeline. Here’s how you can integrate them effectively:
| Stage | Trigger | What to Scan |
|---|---|---|
| Pull/Merge Request | Dependency file changes | Application dependencies (SCA) |
| Build | Every build | Container images, OS packages |
| Scheduled (daily) | Scheduled trigger | Production registries, new CVEs |
| Pre-commit | Developer push | IaC templates, secrets |
Security in CI/CD pipelines demands vigilance. Always pin GitHub Actions to immutable commit SHAs. For example, in March 2026, the "TeamPCP" threat group hijacked 76 version tags in the aquasecurity/trivy-action repository, redirecting pipelines to malware designed to steal credentials. Organisations that pinned to immutable SHAs were unaffected.
With scans running consistently, the next step is to consolidate the results for efficient follow-up.
2.3 Centralise Scan Findings
Dispersed findings across multiple tools can lead to inefficiencies and missed vulnerabilities. Centralising results ensures engineers can focus on resolving issues without wasting time switching between dashboards.
For smaller teams, a unified SaaS platform like Nuvm Cloud is a practical choice. It consolidates results from various scanners - dependency, container, IaC, secrets, and code - into a single interface. It even provides plain-English explanations and ready-to-run remediation commands, streamlining the process for teams without dedicated security personnel. Larger teams might prefer integrating scanner outputs into existing ITSM tools like Jira or ServiceNow, ensuring findings are incorporated directly into developer sprints rather than being relegated to a separate security backlog.
Centralising findings allows issues to be addressed by the right people, promptly and effectively.
3. Triage and Prioritise Dependency Vulnerabilities
Once you've gathered results from a centralised scan, the next step is to sort through the findings and determine which vulnerabilities need immediate attention. It's common for a repository to flag thousands of issues, but not all of them pose a real threat. The key is to filter out the noise and focus on the vulnerabilities that truly matter.
3.1 Set Up a Triage Workflow
Start by assigning each finding to an owner - this ensures accountability and quicker action. Before diving into the review, group duplicate findings across repositories to avoid redundant work. Then, categorise each finding based on severity and its specific context, rather than relying solely on the raw CVSS score. For instance, a critical vulnerability in a decommissioned staging service is far less urgent than a high-severity issue in a public-facing authentication service that handles customer data.
It's also a good idea to cross-check findings against the CISA Known Exploited Vulnerabilities (KEV) catalogue. If a CVE (Common Vulnerabilities and Exposures) appears on this list, it means it’s actively being exploited and should be prioritised immediately.
3.2 Risk-Based Prioritisation
Not every flagged vulnerability is equally urgent. One way to cut through the clutter is by applying reachability analysis. This process determines whether your code actually invokes the vulnerable function. In many cases, this can reduce thousands of findings to just a handful of actionable issues.
"A CVE in a transitive dependency only matters if your code actually reaches it at runtime. Most don't." - cybriumai, Cybrium
Beyond reachability, here are some questions to help prioritise effectively:
| Factor | What to Ask |
|---|---|
| Active exploitation | Is the CVE listed in the CISA KEV catalogue or does it have a high CVSS 4.0 score? |
| Internet exposure | Is the affected service accessible to the public? |
| Data sensitivity | Does the asset handle sensitive information like PII, payment data, or authentication? |
| Library function | Does the library manage critical tasks like cryptography or authentication? |
| Environment | Is the issue in a production environment, staging, or a decommissioned system? |
Libraries that manage critical functions - such as cryptography or authentication - should receive extra attention, even if their CVSS score isn’t particularly high. These components often have an outsized impact when vulnerabilities arise. If a vulnerability can’t be addressed right away, it’s important to have a strong exception process in place.
3.3 Handle Exceptions and Compensating Controls
Sometimes, fixing a vulnerability is not immediately possible. For example, a library maintainer might not have released a patch, or applying an update could disrupt critical systems. In such cases, a formal exception process is crucial - this prevents issues from being indefinitely deferred with vague promises like "we’ll handle it later."
Each exception should be documented thoroughly, including details like:
- Exception ID
- Affected resource
- Business justification
- Approver
- Expiry date
- Reassessment frequency
Without an expiry date, exceptions can easily become permanent and forgotten. When a patch isn’t available, consider implementing compensating controls, such as:
- Adding a WAF (Web Application Firewall) rule to block the attack vector
- Using network segmentation to isolate the vulnerable service
- Tightening IAM (Identity and Access Management) permissions to limit impact
For confirmed false positives, document the reasoning (e.g., code_not_reachable or protected_at_runtime) to avoid cluttering future reviews with irrelevant findings.
If your team has limited security resources, platforms like Nuvm Cloud can simplify the process. These tools consolidate scan results into a single dashboard and offer actionable remediation advice, making triage and exception management more efficient.
4. Remediate and Validate Fixes
4.1 Update Dependencies
Once you've identified the vulnerabilities that require attention, the safest way to address them is by applying the smallest possible upgrade that resolves the issue. Jumping to a new major version could introduce unexpected breaking changes, so it's best to avoid that unless absolutely necessary. Use your package manager (like npm update, pip install --upgrade, or go get -u) to apply the specific patched version. After that, make sure to rebuild any impacted container images using the updated base.
Always test these updates in a staging environment before deploying them to production. For CI/CD dependencies, such as GitHub Actions, it's a good idea to pin dependencies to full, immutable commit SHA hashes rather than using mutable version tags. This practice is crucial, as mutable tags have been exploited in recent CI/CD compromises, making immutable SHAs a much safer choice.
Once the updates are in place, validating the changes becomes the next critical step.
4.2 Confirm and Record Fixes
After implementing fixes, you need to confirm that they’ve been effective. Run your scanner again immediately to verify that the issue has been resolved. This follow-up scan is not just best practice - it’s often a compliance requirement. For example, PCI DSS 4.0 Requirement 11.2 specifically mandates validation through a rescan after remediation.
You can also use VEX (Vulnerability Exploitability eXchange) status labels to document the outcome of your fixes. Labels like fixed, code_not_present, or code_not_reachable can help create a clear and traceable record of your remediation efforts. Be sure to link these records to relevant pull requests, ticket references, and updates to your SBOM (Software Bill of Materials).
4.3 Align Remediation Records with Compliance Requirements
Once fixes are verified, make sure your remediation records align with compliance standards. Remember, fixing a vulnerability and proving that it’s fixed are two separate tasks. Auditors for frameworks like SOC 2, ISO 27001, and PCI DSS will expect to see detailed scan reports, SBOMs, and evidence of remediation over a specified period - usually between 90 days and one year. To make this process easier, configure your tools to automatically retain these artefacts, rather than relying on manual exports before every audit.
| Compliance Framework | Evidence Required |
|---|---|
| SOC 2 / ISO 27001 | Vulnerability scan logs, change audit trails, proof of timely patching |
| PCI DSS | Rescan reports showing no "High" vulnerabilities, host-level audit logs |
| GDPR | Data classification records, access control logs, encryption status |
If your organisation uses Nuvm Cloud, its dependency scanner simplifies this process by mapping findings directly to controls for SOC 2, PCI DSS, ISO 27001, and NIS2. It also retains compliance evidence automatically, eliminating the need to scramble for records before an audit. Each finding includes an easy-to-understand explanation and a pre-built remediation command, providing a clear record of the recommended fix. These practices create a seamless remediation cycle that integrates smoothly with ongoing dependency management, which will be discussed in the next section.
5. Embed Dependency Management into Day-to-Day Work
Once you've established solid scanning and triage practices, the next step is to integrate dependency management into daily development routines. This helps prevent vulnerabilities from slipping into production.
5.1 Add Dependency Checks to Development Workflows
The best way to minimise vulnerability exposure is to catch issues early - ideally before they even leave the developer's environment. This means weaving security checks into the tools and workflows developers already use, rather than treating security as an afterthought.
For example, you can install IDE scanner plugins (available for tools like VS Code and IntelliJ) to flag vulnerabilities as developers write code. Combine this with pre-commit hooks to detect secrets in code and run lightweight scans before code is pushed. Then, configure your CI/CD pipeline to automatically block merges if it detects a high-severity issue. To keep things streamlined, prioritised findings can be sent directly to tools like Jira or Slack. This way, engineers stay focused without needing to jump between dashboards.
Once these checks are in place, tracking progress through meaningful metrics becomes essential.
5.2 Track Key Metrics
Fixing vulnerabilities is crucial, but how do you know if your efforts are making a lasting difference? A few focused metrics can provide a clearer picture than just counting CVEs.
One key measure is Mean Time to Remediate (MTTR). High-performing teams aim to resolve critical vulnerabilities within 72 hours and high-severity ones within 30 days. Beyond speed, it's important to monitor scan coverage - mature programmes aim to cover over 95% of assets - and maintain a false positive rate below 5% to ensure developers trust the tools they’re using.
| Metric | Target | Why It Matters |
|---|---|---|
| MTTR (Critical) | < 72 hours | Reduces the time systems are exposed to critical risks |
| MTTR (High) | < 30 days | Ensures high-severity issues are addressed promptly |
| Scan Coverage | > 95% of assets | Identifies vulnerabilities across your entire environment |
| False Positive Rate | < 5% | Maintains developer confidence in the results |
| SLA Compliance | > 90% | Shows the reliability of your security programme |
| Recurring Vulnerability Rate | Decreasing trend | Highlights systemic improvements and better practices |
Another valuable metric is the recurring vulnerability rate - tracking whether the same issues keep reappearing. If patched vulnerabilities resurface, it could signal problems like a broken build process or improperly pinned dependencies.
5.3 Review Tools and Coverage Regularly
Even with robust workflows and ongoing monitoring, it's important to periodically review your tools and coverage to ensure nothing slips through the cracks. Continuous scanning is vital, but human oversight is still necessary. Conduct quarterly audits to check if any new services, third-party integrations, or shadow IT assets have fallen outside your monitoring scope.
During these reviews, revisit any active vulnerability exceptions to confirm that the original business justification still holds up. Also, assess whether your current tools are still suitable for your team’s needs. For smaller SaaS teams without a dedicated security team, platforms like Nuvm Cloud can simplify things by combining dependency scanning, container scanning, and SBOM generation on a single dashboard. This reduces the complexity of managing multiple tools while making compliance tasks easier. For teams that prefer open-source options, tools like Trivy and Grype remain excellent CLI-first choices worth reconsidering as your workflows evolve.
The ultimate goal isn’t to find the "perfect" tool - it’s to ensure your current setup has no major blind spots and enables your team to act quickly on any findings.
Conclusion: Making Dependency Management a Routine Practice
Dependency management isn't just a one-time task - it's an ongoing process that requires consistent attention. To make it manageable, follow these five key steps: maintain a complete inventory of dependencies, use automated scans, prioritise risks effectively, address issues promptly, and integrate security into daily workflows. These steps work together as a continuous cycle, not as isolated actions.
The goal is to shift from reacting to problems as they arise to proactively managing them. As Hive Pro aptly stated:
"Cloud vulnerability management is not a tool you buy. It is a discipline you build." – Hive Pro
One effective approach is reachability analysis, which narrows down vulnerabilities to those that are actually executed at runtime. This can turn thousands of potential issues into a manageable list of actionable items. Beyond speeding up remediation, this method also simplifies compliance. Tools that automatically align findings with frameworks like SOC 2 or ISO 27001 can transform audits from stressful quarterly events into straightforward tasks.
For smaller SaaS teams without dedicated security staff, platforms like Nuvm Cloud can make a big difference. Features like automated scanning and compliance mapping help embed security into everyday operations.
Start by focusing on your most critical dependencies. Incorporate scanning into your CI/CD pipeline and establish clear SLAs for addressing critical issues. The key is consistency. A dependable programme that runs smoothly is far more effective than an overly ambitious one that frequently stalls. By following these steps, you can make dependency management a seamless part of your workflow.
FAQs
What should my first SBOM include?
Your first Software Bill of Materials (SBOM) should include a detailed inventory of all operating system packages and third-party software dependencies, along with their exact versions. This provides clear insight into your software supply chain and helps pinpoint any known vulnerabilities (CVEs). It’s also important to record software licences to ensure compliance. Tools like Trivy or platforms such as Nuvm Cloud can simplify the process by automating SBOM creation and monitoring, making it easier to manage over time.
Where in CI/CD should scans run?
Running dependency vulnerability scans directly in your CI/CD pipelines gives you early warnings and helps stop vulnerable builds from being deployed. These scans usually trigger automatically during events like a push or pull request, ensuring issues are caught as early as possible. Instead of depending on periodic and manual checks, use specialised CI/CD tools designed for dependency scanning - and, if needed, extend this to container or Infrastructure-as-Code (IaC) scans.
How do I prioritise CVEs that matter?
To prioritise CVEs effectively, it's important to look past CVSS scores and adopt a context-aware approach. Begin by determining whether your code actually invokes the vulnerable function during runtime - many transitive vulnerabilities are not reachable. Next, evaluate whether the affected asset is exposed to the internet and think about the potential business impact. Lastly, check if the vulnerability is being actively exploited, referencing resources like the CISA KEV catalogue. Tools like Nuvm Cloud streamline this process by offering unified scanning and practical insights.