How to Assess Dependency Risks in Codebases
How to Assess Dependency Risks in Codebases
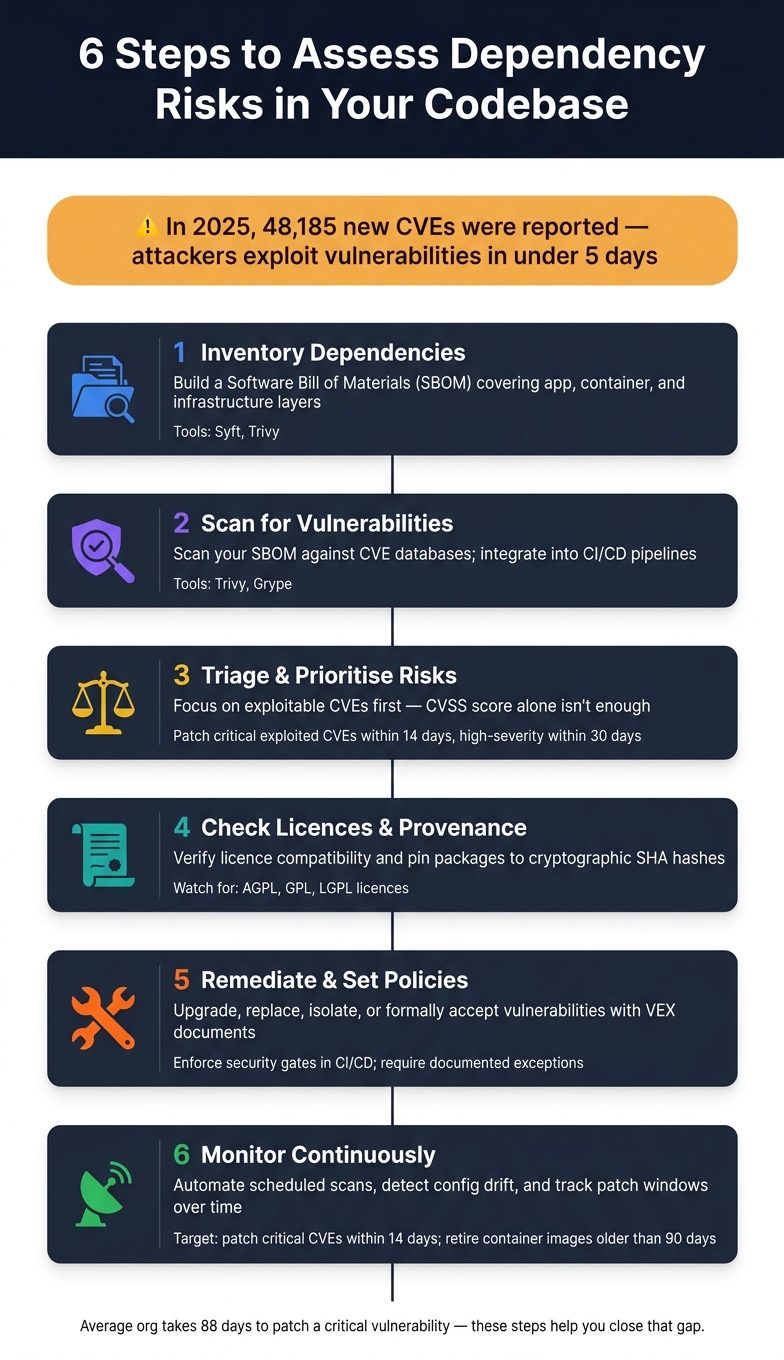
Modern software relies heavily on third-party dependencies, increasing security risks. Vulnerabilities in these dependencies can lead to breaches, outages, or legal issues. In 2025 alone, over 48,000 new CVEs were reported, with attackers exploiting vulnerabilities in less than five days.
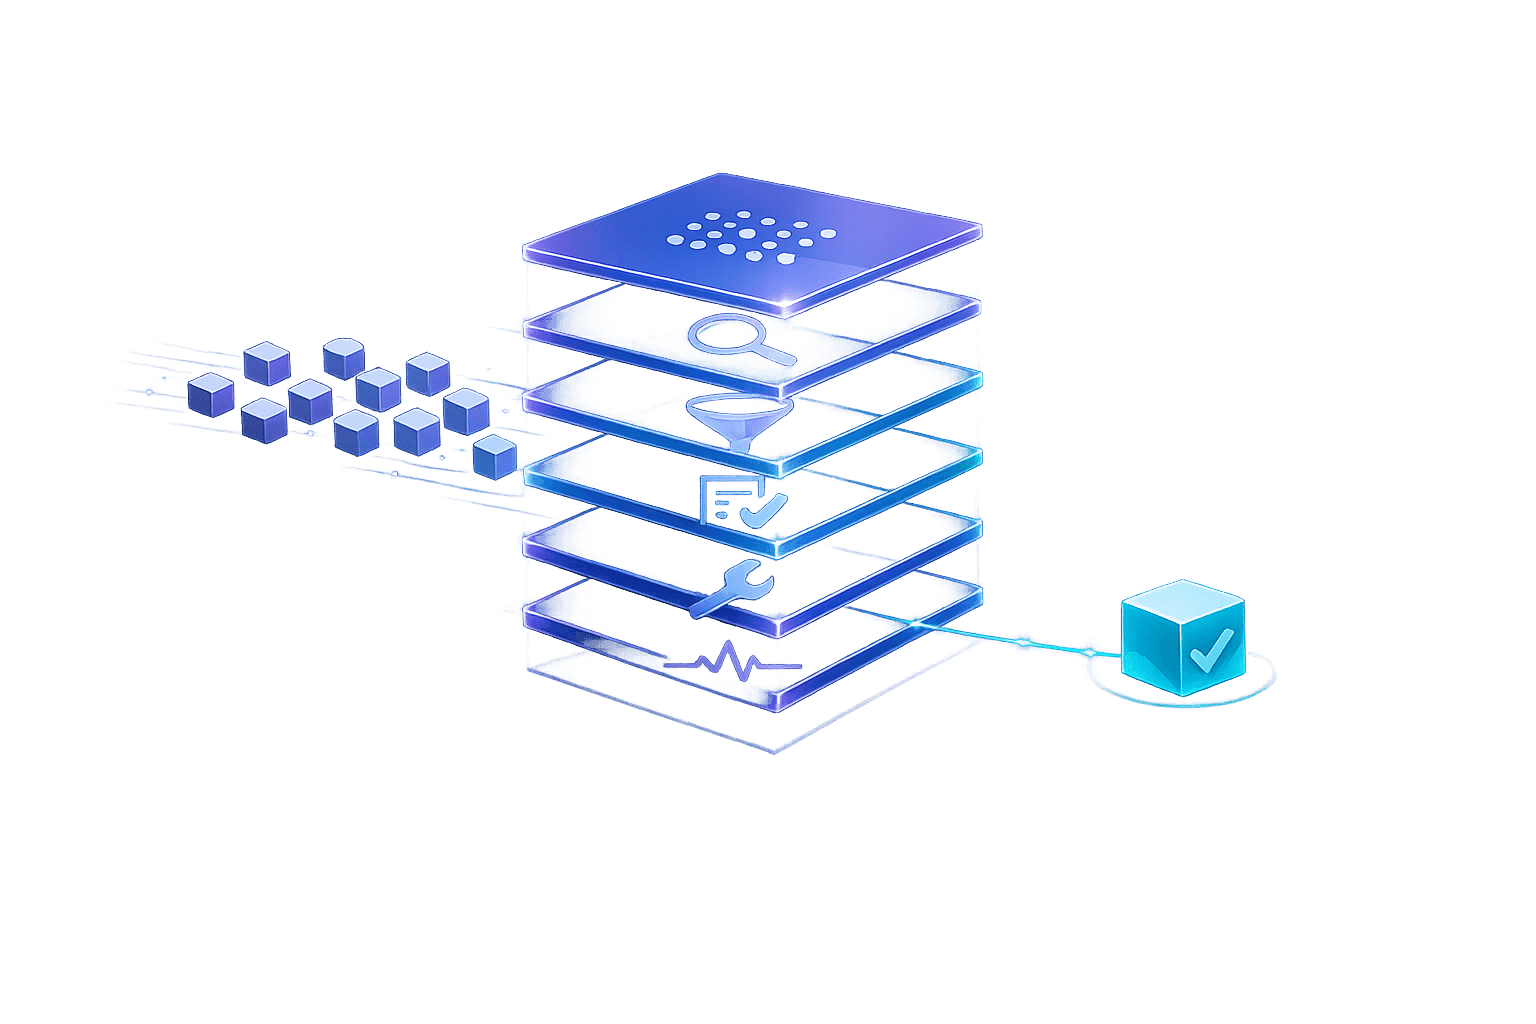
To protect your codebase, follow this six-step approach:
- Inventory Dependencies: Create a Software Bill of Materials (SBOM) to map all direct and indirect dependencies, including application, container, and infrastructure components.
- Scan for Vulnerabilities: Use tools like Trivy or Grype to identify risks in your dependencies.
- Prioritise Risks: Focus on vulnerabilities that are actively exploitable or impact critical systems.
- Check Licences and Integrity: Ensure compliance with open-source licences and verify package authenticity using cryptographic pinning.
- Fix and Set Policies: Address vulnerabilities through updates, replacements, or mitigations, and establish clear patching timelines.
- Monitor Continuously: Automate scans and track risk metrics to maintain security over time.
Platforms like Nuvm Cloud can simplify these tasks by integrating multiple scanners into one dashboard, helping small teams manage risks efficiently. Addressing dependency risks is an ongoing process, but with the right tools and strategy, it becomes manageable.
6-Step Framework to Assess Dependency Risks in Your Codebase
Managing Vulnerabilities in Open-Source Dependencies - Eva Sarafianou, Mattermost

Step 1: Inventory Your Dependencies
Start by mapping out all the dependencies in your codebase. While most engineering teams are aware of their direct dependencies - those explicitly listed in files like package.json, requirements.txt, or pom.xml - it's easy to overlook the indirect ones. These include the dependencies your packages rely on, components in container base images, and infrastructure modules brought in through tools like Terraform or Helm charts. A thorough inventory should cover all these layers.
The foundation of this process is creating a Software Bill of Materials (SBOM). This is a machine-readable list of every component in your software. Without an SBOM, making informed security decisions becomes nearly impossible.
Where to Find Dependency Data
Dependency data can be found in several places:
- Package manager files: Files like
package-lock.json,Pipfile.lock, orgo.sumdetail application dependencies. - Container manifests: These reveal OS packages within container images.
- Infrastructure-as-Code files: Tools like Terraform, Helm charts, or Kubernetes manifests uncover additional layers of dependencies.
To simplify the creation of an SBOM, there are two open-source tools worth exploring:
- Syft (by Anchore): Specialises in generating SBOMs and supports a wide range of ecosystems and container images.
- Trivy (by Aqua Security): Goes a step further by generating SBOMs in CycloneDX and SPDX formats while simultaneously scanning for vulnerabilities.
"Trivy is a comprehensive and versatile security scanner that can find vulnerabilities, misconfigurations, and secrets in containers, Kubernetes, code repositories, and more." - Aqua Security
Here’s a quick summary of what to inventory and which tools can help:
| Layer | What to Inventory | Key Tools |
|---|---|---|
| Application | Direct and transitive dependencies (npm, Maven, PyPI) | Syft, Trivy |
| Container | Base images, OS packages (e.g., Alpine, Ubuntu) | Syft, Trivy, Grype |
| Infrastructure | Terraform, Helm, CloudFormation, Kubernetes manifests | Checkov, Trivy |
This inventory provides the groundwork for effective vulnerability scanning.
Why Transitive Dependencies Matter
Transitive dependencies - those that your direct dependencies rely on - are often overlooked but can pose significant risks. These indirect dependencies are more prone to vulnerabilities because they typically receive less attention.
Consider this: 85% of container images contain high or critical vulnerabilities. As Bibin Kuruvilla from Obsium explains:
"Most CVEs are in base image layers that your application never calls. A vulnerable version of libxml2 in your base image is not a risk if your application does not parse XML."
Building a complete dependency map is crucial for managing these risks. By running tools like Syft or Trivy on your repositories and container images, committing the SBOM output to version control, and integrating SBOM generation into every build, you establish a clear and up-to-date view of your dependencies. This step is essential before diving into vulnerability scans.
For teams without dedicated security engineers, unified solutions can simplify this process. Platforms like Nuvm Cloud offer automated SBOM generation and continuous monitoring across various security domains, making it easier to manage dependency risks efficiently.
Step 2: Scan for Known Vulnerabilities
After creating your SBOM in Step 1, the next move is to use it for scanning dependencies against vulnerability databases. This process helps identify potential risks quickly, with automated scans capable of flagging vulnerabilities in mere seconds. Essentially, your SBOM becomes more than just a list - it's a tool for uncovering actionable risks.
Open-Source Tools for Scanning
If you're looking for open-source options, Trivy and Grype are two excellent tools for dependency scanning:
- Trivy: This tool can generate SBOMs and compare them against databases such as the GitHub Advisory Database. It covers a wide range, including containers, filesystems, and infrastructure-as-code.
- Grype: Designed with container workflows in mind, Grype scans container images and filesystems for CVEs using SBOMs created by Syft.
The main difference lies in their focus. While Trivy offers broader coverage, Grype specialises in container-related tasks. Both tools are highly effective, but the choice depends on your specific needs.
One thing to watch out for is the "noise" from scanners - excessive, low-priority alerts can make it harder to focus on critical vulnerabilities. A scanner with good prioritisation logic is essential, and this will be explored further in Step 3.
For a more streamlined approach, platforms like Nuvm Cloud combine these scanning capabilities into a single, user-friendly dashboard.
Automating Scans in CI/CD
To maintain ongoing protection, integrate these scanning tools into your CI/CD pipeline. By doing so, you can catch vulnerabilities during pull requests, long before they make it into production. This approach aligns with shift-left security, addressing issues at the earliest stages of development.
For example, you can configure Trivy to run as part of your CI job, ensuring builds fail when high-severity, exploitable vulnerabilities are detected. However, it's crucial to avoid blocking merges over minor, low-risk issues - this can cause unnecessary delays.
When using GitHub Actions, always pin them to full commit SHA hashes rather than mutable tags. A cautionary tale comes from March 2026, when TeamPCP compromised the Trivy Action by overriding version tags. This attack led to the theft of AWS and GCP tokens, Kubernetes secrets, and SSH keys. Using a full-SHA reference can prevent such security breaches.
"Scanning tells you what could go wrong. It does not tell you what is going wrong right now." - Bibin Kuruvilla, Cloud Management Expert, Obsium
Why CI/CD Scanning Matters
The numbers speak for themselves: 48,185 new CVEs were published in 2025, marking a 20.6% increase from 2024. What's more, the median time for exploitation has dropped to less than five days. Embedding scans directly into your pull request workflow ensures that new vulnerabilities are detected and addressed before they can cause harm.
"CI/CD pipelines have become the 'new perimeter' of security." - Kaspersky
Step 3: Triage and Prioritise Risks
Once vulnerabilities are identified, the next crucial step is figuring out which ones need your immediate attention.
"If everything is critical, nothing is critical. You need a way to filter the noise." - Obsium
Severity and Exploitability Metrics
While CVSS scores (ranging from 0 to 10) are useful for gauging vulnerability severity, they don’t always reflect actual risk in practice. A more telling factor is exploitability. For example, if a vulnerability is listed in CISA's Known Exploited Vulnerabilities (KEV) catalogue, it’s a clear sign that attackers are actively taking advantage of it. This makes exploitability a key focus for deciding which vulnerabilities to address first.
"A CVSS 9.8 that requires physical access to the machine is less dangerous than a CVSS 7.5 that is being actively exploited in the wild." - Bibin Kuruvilla, Obsium
Distinguishing Critical Issues
Not all high-severity vulnerabilities are created equal. Context matters - factors like where the vulnerable component resides and the sensitivity of the data it handles can help you decide what to tackle first.
| Prioritisation Factor | High Priority | Lower Priority |
|---|---|---|
| Network Exposure | Internet-facing service | Internal-only / private subnet |
| Exploit Status | Listed in CISA KEV or public exploit available | No known exploit or theoretical risk |
| Reachability | Vulnerable code path executed at runtime | Vulnerable code is not executed |
| Data Impact | Handles sensitive data (e.g. PII, credentials) | Handles non-sensitive logs or metadata |
One critical step is assessing reachability. A vulnerability only becomes a real issue if the affected code is actually executed by your application. For example, a transitive dependency might seem concerning on the surface, but if your code doesn’t call the vulnerable function, the risk is minimal. Tools that perform reachability checks can help cut down a mountain of findings to just a small list of actionable issues.
As a rule of thumb, aim to patch exploited critical vulnerabilities within 14 days and high-severity ones within 30 days. This is a significant improvement over the average organisation, which currently takes 88 days to patch a critical vulnerability. Hitting these targets can dramatically reduce your organisation’s exposure.
For a streamlined process, platforms like Nuvm Cloud provide a unified dashboard that brings together alerts from various sources, including dependency scanners, while offering clear, easy-to-understand remediation guidance.
With risks prioritised, the next step is to tackle them head-on with targeted remediation strategies.
sbb-itb-5d9b290
Step 4: Address Licence and Provenance Risks
Vulnerability scanning is a great start for tackling security flaws, but it's only part of the picture. To truly secure your software supply chain, you also need to manage licence compatibility and package provenance. These risks often get overlooked - until they cause serious problems.
Licence Compatibility Checks
Not all open-source licences are suitable for commercial software. For example, dependencies under the AGPL licence can force you to disclose your proprietary code. To avoid such pitfalls, you can set up automated licence checks in your CI/CD pipeline. This way, any flagged licences - like AGPL, GPL, or LGPL - can cause builds to fail before they become an issue. Tools like Trivy can help by listing licences across your entire dependency tree. For a more advanced approach, platforms with contextual awareness can identify legal risks and even provide compliance-ready reports.
Don't forget to extend these checks to transitive dependencies - the ones buried deep in your dependency tree. These can carry hidden legal risks that might otherwise go unnoticed. Creating a Software Bill of Materials (SBOM) in standard formats like CycloneDX or SPDX can give you a clear, auditable record of every licence in your supply chain. This is especially helpful for meeting compliance standards like SOC 2 or ISO 27001, as it shows you're keeping a close eye on third-party components.
If your team doesn't have dedicated security engineers, consider using platforms like Nuvm Cloud. These tools provide a unified dashboard that combines licensing and dependency scanning, making it easier to manage risks and stay compliant.
But once you've addressed licence issues, there's another critical area to focus on: package integrity.
Package Integrity and Trusted Sources
Legal risks are only half the battle. Ensuring the authenticity of your packages is just as important to protect against supply chain attacks. Even official registries like PyPI or npm don't guarantee package integrity. Mutable version tags, for instance, can be exploited - recent attacks have shown how this can lead to breaches.
This is why cryptographic pinning is so important. Instead of relying on mutable version tags, pin your dependencies to specific cryptographic SHA hashes. A hash is immutable, meaning if a package changes, the hash won't match, and your build will fail. This acts as an early warning system, alerting you to potential tampering. You can also pair this with checksum verification to further protect against attacks that override tags.
"CI/CD pipelines have become the 'new perimeter' of security." - Kaspersky
Step 5: Remediate and Set Policies
Now that you've addressed licensing and provenance in Step 4, it's time to tackle vulnerabilities and establish robust security policies. Once you've identified dependency risks, the next step is deciding how to fix them. Fixing vulnerabilities often requires more than just updating a dependency. The right solution depends on factors like the severity of the issue, whether a patch is available, and how deeply the dependency is embedded in your codebase.
Remediation Strategies
When you discover a vulnerable dependency, there are four practical approaches to consider. Each comes with its own advantages and challenges:
| Strategy | Pros | Cons | Best For |
|---|---|---|---|
| Upgrade | Fixes the root cause and is often easy to automate | Potential for breaking changes; requires thorough testing | Common vulnerabilities with a stable, patched version available |
| Replace | Removes the risk entirely and can improve code quality | Requires significant engineering effort and refactoring | Dependencies that are unmaintained or frequently vulnerable |
| Isolate/Mitigate | Quick workaround when no patch exists; avoids altering production code | Doesn't eliminate the vulnerability; adds monitoring complexity | Zero-day vulnerabilities or legacy systems that can't be updated right away |
| Accept (VEX) | Reduces noise and provides documentation for audits | Requires detailed analysis to confirm non-exploitability | Vulnerabilities in code paths that are never executed at runtime |
Upgrading is often the most straightforward choice, but using reachability analysis can help you focus on vulnerabilities that genuinely pose a risk. This method can reduce your list of "critical" issues by as much as 90%, making the task far more manageable. Tools like Grype and Trivy can assist in identifying vulnerabilities, while platforms like Nuvm Cloud integrate scanning into a single dashboard. This is especially useful for teams without dedicated security engineers to handle alerts.
If no patch is available, Vulnerability Exploitability eXchange (VEX) documents can help. These records explain why a vulnerability isn't exploitable in your environment - perhaps the vulnerable function is never called or is protected at runtime. Such documentation is invaluable during audits, showing that you've made informed, deliberate decisions.
With these strategies in mind, the next step is to formalise your approach by creating clear dependency policies.
Defining Dependency Policies
Once immediate vulnerabilities are addressed, the focus should shift to prevention. The aim is to create rules that stop issues from reoccurring and automate their enforcement.
Start by setting patch SLAs (Service Level Agreements). These internal targets define how quickly vulnerabilities should be addressed based on their severity. A good starting point is to fix critical CVEs with known exploits within 14 days and high-severity issues within 30 days. To prioritise effectively, cross-check your findings with CISA's Known Exploited Vulnerabilities (KEV) catalogue, which highlights vulnerabilities actively used by attackers.
Next, implement security gates in your CI/CD pipeline. These gates should automatically block deployments if a dependency fails to meet your thresholds - for example, a critical CVE, a disallowed licence, or an unapproved package. Pair these gates with a formal exception process. If a vulnerability can't be fixed immediately, require a documented reason, an approver, and an expiry date for the exception. Without this structure, exceptions can become permanent oversights.
"IT security governance has traditionally been somebody saying 'You have to fix these vulnerabilities.' Now, people can look up and say, 'This is the attack path, and this is what I should do.'" - Roland Lechner, Director of IT Security, BMW
Finally, enforce SHA-based pinning for your CI/CD actions and base container images. Avoid relying on mutable version tags. By enforcing SHA-based pinning, you ensure that builds fail if any changes occur, adding an extra layer of protection.
Step 6: Monitor Continuously and Track Progress
Once you've set up clear policies and a structured approach to fixing vulnerabilities, the next step is to ensure your codebase stays secure over time. Continuous monitoring plays a key role here, as it provides ongoing oversight rather than just a one-time snapshot. While a single assessment might highlight risks at a specific moment, continuous monitoring gives you a real-time view of your security posture - essential in today’s ever-changing threat environment. Let’s dive into how you can turn periodic scans and drift detection into actionable, real-time safeguards.
Continuous Monitoring Best Practices
Automating scans is a game-changer. Instead of relying on manual checks, set up tools like Trivy or Grype to run on a fixed schedule, ideally as part of your deployment pipeline. These tools can automatically alert your team to newly disclosed CVEs (Common Vulnerabilities and Exposures) and detect configuration drift - when production environments stray from their secure, version-controlled state - all without requiring manual effort.
Adding runtime context to vulnerability data can help prioritise issues more effectively. For instance, a critical CVE affecting an internet-facing service that handles customer data should take precedence over the same CVE found in an internal tool with no external exposure.
For teams without a dedicated security engineer, managing alerts from multiple tools can quickly become overwhelming. This is where platforms like Nuvm Cloud are incredibly helpful. They bring together dependency scanning, container checks, code analysis, secrets detection, and cloud posture assessments into one dashboard. With clear, plain-English explanations for each finding, these platforms simplify the process and enable faster responses to new CVEs. By combining automation and unified monitoring, you can ensure your security policies remain effective over time.
Tracking Risk Reduction Over Time
Continuous monitoring provides a steady stream of insights, but it’s equally important to measure your progress. One key metric is the patch window - the time between the public disclosure of a CVE and the deployment of a fix. Aim to address critical vulnerabilities within 14 days to minimise exposure. Additionally, regularly check the age of your production container images. Containers older than 90 days are more likely to contain unpatched vulnerabilities.
Over time, tracking these metrics helps turn security from a reactive process into a proactive and measurable discipline. Demonstrating consistent improvements in fixing vulnerabilities not only strengthens your security posture but also shifts dependency management from a compliance task to a narrative of ongoing progress.
Conclusion: Building Resilient Codebases
Managing dependency risks isn’t something you can check off a to-do list and forget. It’s an ongoing process that relies on consistent, repeatable actions. The six steps outlined here - inventory your dependencies, scan for known vulnerabilities, triage by exploitability, address licence and provenance risks, set clear remediation policies, and monitor continuously - work together to create a practical, step-by-step framework. When followed, this approach transforms an intimidating challenge into something that can be tackled systematically. Acting quickly is key, and this process helps teams do just that.
The urgency is clear: the time between vulnerability disclosures and exploitation is shrinking fast, while patching often takes far too long. This growing gap makes delays more dangerous than ever.
For small to medium SaaS teams without a dedicated security engineer, the solution lies in simplifying the process. Using separate tools for tasks like dependency scanning, container checks, secrets detection, and cloud posture can create confusion and leave gaps. Platforms such as Nuvm Cloud streamline these tasks by combining nine different scanners into one dashboard. They also provide plain-English explanations and actionable remediation commands, making it easier to respond quickly and effectively.
Adopting shift-left practices - catching vulnerabilities during pull requests and in CI/CD pipelines instead of after deployment - paired with continuous monitoring, can drastically cut detection times from months to just hours. This proactive approach is what sets genuinely secure teams apart from those that only meet basic compliance standards. By embracing these steps, teams can create codebases that are not just secure but resilient in the face of evolving threats.
FAQs
What should my SBOM include beyond app libraries?
A thorough Software Bill of Materials (SBOM) extends beyond just application libraries. It should also include operating system packages, container images, and infrastructure-as-code (IaC) configurations. Tools like Trivy add another layer of security by checking for sensitive data exposure, software licence compliance, and cloud configuration issues. For SaaS teams, Nuvm Cloud makes this process easier. It provides a unified dashboard covering nine scan categories, complete with plain-English explanations and actionable remediation commands to help manage risks efficiently.
How should I prioritise which CVEs to address first?
When tackling CVEs, prioritising exploitability and reachability can make a huge difference. Start by focusing on vulnerabilities listed in the CISA Known Exploited Vulnerabilities (KEV) catalogue, especially those affecting internet-facing services. These are often the most critical and should be addressed first.
Next, conduct a reachability analysis to determine if the vulnerable component is actually executed during runtime. Why is this important? It helps cut down on unnecessary alerts, allowing you to focus on what really matters.
Tools like Nuvm Cloud can simplify this process. By consolidating scan results and offering clear, actionable remediation steps in plain English, it’s particularly helpful for smaller teams managing limited resources.
How can I prevent dependency attacks in CI/CD?
To keep your CI/CD pipeline safe, it's crucial to treat security tools as if they were high-value assets. One effective step is pinning GitHub Actions to immutable commit SHA hashes. This prevents potential attacks that could exploit mutable tags. It's also essential to keep an eye on configuration drift and any unauthorised access, particularly after rotating secrets.
For smaller SaaS teams, tools like Nuvm Cloud can be a game-changer. They combine dependency scanning with other checks, providing clear guidance on how to fix issues. Plus, they focus on exploitable vulnerabilities, helping to reduce the noise from false positives.